MainStage Mondays: Setting Up Your First MainStage Keyboard Rig
I received this email from Mat this week:
I'm a long-time church keyboardist, but just now a part of a group that is willing (and equipped) to look at using software and technology to enhance the performance. We're using Ableton a little bit today to play tracks and a click, but how to you recommend I get started learning to use software like MainStage, a MacBook Pro, and my keyboard?
Maybe better said: if you were starting over with no prior experience other than playing the piano, and wanted to learn how to use all these components, what would you recommend?
Thanks so much,
Mat
Hi Mat,
A lot of people write me about this (4 people this week alone!), so I've decided to create a comprehensive guide to setting up, running, and tweaking your first MainStage rig.
Before we start, here’s what you need:
1. A midi keyboard
2. An audio interface
3. A fast Mac computer
4. MainStage 3 or later
5. All the necessary cables
If you’d like to know my opinions on what to get, check out this blog post, this blog post, and this buying guide. I’ll be updating several of these soon to include some of the brand new gear on the market, but I still stand by my opinions in all of these articles.
Now that we’ve got all the basics out of the way, let’s get started.
Keyboard + Computer Setup
First thing you’ll want to consider when putting together your rig is placement. I personally use an Ultimate Stands dual tier keyboard stand. I put my keyboard on the 1st tier, and my laptop on the 2nd tier.
This allows the screen to be directly in front of my face, with easy access for adjustments using the keyboard and mouse. Whatever setup you use, try to keep it consistent so you can build muscle memory. Also, this allows you to view sheet music in MainStage using my free sheet music template (Email me if you would like a free download of this template).
Remember, speed is key when working live, and having your gear placed ergonomically will help you stay focused during long practices.

My keyboard rig. I try to keep the format the same at home and onstage.
Connecting Your Gear
Hook up all of your cables, then open MainStage. Select a template, then go to the Layout screen in the LH corner of the window and click “Layout”.

If your midi controller is properly connected, you should be able to play the keyboard and have notes be pressed down on the onscreen keyboard.

This process should be the same for the modulation and pitch wheels, sustain pedals, etc.
Go back to the Edit window, and play some notes. You should see the Output volume meter move.

Now, go to MainStage 3>Preferences.

Here’s where you can set which audio interface you want to use. I’m going to select my MOTU MicroBook II as my audio output.

Now go to the “Advanced Settings”. This is where you’ll select how much buffering you need (note: buffering is how long it takes between when you hit the notes on your keyboard and when you hear the sound. I personally recommend 256, but you may prefer a different setting).

Click OK to save your settings. You should now have your audio routed through your audio interface. For more info about how to route audio using your particular audio interface, check out your user manual.
Creating Your First Patch
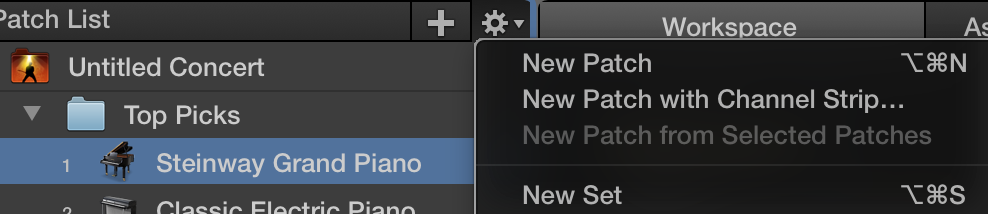
Patches are individual instruments In the LH corner of the screen under Patch List, press the “+” button to add a new patch.

Under Patch Settings, select “instrument”, then pick a patch. I’m going to use a grand piano sound for this example.

Your MainStage program should now look like this:

Picking Your Sounds
Now comes the tricky part- picking the sounds you want to use in your live set. I personally recommend checking out Mainstage’s Keyboard template for some great starter sounds, or you could check out my online store for custom patches I’ve developed.

Before going to a practice, I’d recommend listening to the songs you’re planning on playing, and trying to hear what sounds are on the recording. Piano, organ, and strings are the easiest to identify, but make sure to listen for things like atmospheric pads and synths, too.
Check with your music director or worship leader to see what sounds he wants you to cover. Are you using tracks? If so, are some of the keyboard parts on it? Do you want me to cover mostly the piano sounds, or focus on the synth/strings/organ parts? Make sure to communicate before you show up to practice.
Once you’ve identified some of the parts, start hunting for patches that fit. You can do this by hunting through the Patch Library in the Edit screen.

Next create a folder for each song in your setlist. Under Patch List, select “New Set”.
Rename it to the name of your song, then drag patches into the folder. This will keep you organized onstage.

Optimizing for Practice
Before you get onstage, make sure to restart your computer. This will help it work more efficiently.
Also:
• Quit all your open applications except MainStage.
• Make sure you have at least 1/3rd of your hard drive free.
• Disable your Notifications in the RH corner of your OS X screen
Practice
When you arrive at your first practice, show up early so you have time to trouble shoot. I’d recommend asking the audio engineer to show up a bit early so you can run over your new setup with him, too.
During the practice try to use the sounds you selected at home, but don’t be afraid to pull in extra sounds, too. I recommend leaving all the stock patches in the Keyboard MainStage template in your project, so you don’t have to hunt for the right sound during the set. Keep an eye on the volume, too- some patches can be louder than others.
When you’re done with the practice, delete all patches except the ones you’ll use at the performance.
Performance
Again, arrive early to make sure everything is running correctly. Once you’ve finished your performance, save your project.

Also, save your individual song patches for future use. Under Patch List in the LH corner of the Edit screen, click the little gear icon and select “Save as Set . . .”

Final Thoughts
You’ve now finished your first performance with MainStage- congratulations! If things didn’t run smoothly, don’t give up- the only way to get good at using any technology is spending time working with it.
If you still have questions, I offer one-on-one MainStage training via Skype. Contact me via email to find out pricing and setup a time. Thanks!